

Regular emoji getting old? Want to dazzle your friends with some new text characters? There's a hidden keyboard built right in to iOS!

News & Updates
Most people use the Safari app every day, it’s the built-in web browser for Apple’s iOS. It’s a fairly straightforward and easy to use app but there are a few menus that can make some things easier and quicker to use. Most of these menus are accessed by long pressing the link but some can also be accessed by using force touch.

Pretty easy, right? You see a link in a page and you click on it. But, did you know there are more options if you long press the link? When you long press a link you have the following options: Open, Open in New Tab, Add to Reading List, Copy or Share.
This menu can also be accessed on an iPhone by using force touch and sliding up. If you are on an iPad you will also have the option to Open in Split View.
Ever see an image on a website you liked and wanted to save it, maybe make it your background? To save an image simply long press the image and this will give you a menu with the option to Save Image or copy it to you clipboard. If the image is also a link it will give you the link options listed above.
This menu can also be accessed on an iPhone by using force touch and sliding up.
Simply tapping on the bookmarks icon in the bottom toolbar will pull up your favorites and bookmarks. But long pressing this icon will give you an easy option to add a bookmark to the webpage you are currently on or add it to your reading list.
Here are another set of buttons that you probably use all the time. Did you know they had a hidden menu? When you long press either the forward or back button it will pull up a history of that particular tab you are browsing on.
The tabs button is the easy way to access a preview of all your open tabs, located in the bottom toolbar on the far right. Ever suddenly realize you have WAY too many tabs open? When you long press the tabs you get a few options, one of them being “Close All Tabs”. Other options you are presented with are: Close this Tab, New Private Tab & New Tab.
Ever accidentally close out a tab you wanted to keep open? Now you have to either remember what page you had open or go back through your history. Or, you can long press the + (New Tab) button. When this is long pressed it pulls up a menu that shows you all your recently closed tabs.
Another way to close out all your tabs is to long press the “Done” button in the tabs views.
Most websites have multiple versions, a desktop version and a mobile version. When you visit from an iPhone or an iPad it will try to serve you up the mobile version. Sometimes the mobile version lacks features from the desktop version and can be a little frustrating. One way to get around this is to long press the reload button.
When you do this it brings you a menu that allows you to “Request Desktop Site”. This will attempt to reload the website while asking the server to show the full desktop version instead of the mobile version.
Safari has a really cool mode called “Reader View”. This takes a website and isolates only the text and turns it black and white making it easy to read. If there is a website you are always activating Reader Mode on a specific website you can automate this. Long press on the reader icon (in the left in the URL bar) and you can choose to have reader mode automatically activate on a particular website or on all websites.
The URL/search bar in Safari is an amazing tool with the ability to both go to an address or perform a search. One hidden menu is “Paste and Go”. If you long press the URL bar you have the option of whatever you have copied to you clipboard can be pasted and immediately acted on. If it is a URL it will send you straight there. If it is simply words then a search will be performed. This can save you a few extra taps when using Safari.

The day is finally here! After a few months of teases and public and developer betas iOS 11 is available to the general public. This version of iOS can be installed on iPhones 5s and newer, iPad Mini 2 and up, iPad Air and up and iPod Touch 6th Gen. There are a TON of new features, too many to list all of them so I am just going to highlight a few for you.
There are a lot of functionality changes coming to the iPad that bring it closer to a desktop system and may make it even more of an option to be a laptop replacement.

No longer is the dock stuck only to the home screen but can now be accessed from anywhere with just a swipe up from the bottom. The left side of your dock can be customized with whatever apps you want to put in it, just like before and now the right side of the dock will show apps that you’ve recently opened.
There is a new app called Files that gives you easier access to all your files stored on your iPad, on iCloud and even services like Google Drive, Dropbox and Adobe Cloud. From Files you can browse, organize and share all your files. The Files app will also be available on iPhones.
Multitasking on the iPad keeps getting better and better. iOS 10 introduced ‘Slide-over’ and ‘Split View’ but now you can communicate more easily between those apps. You can move just about anything anywhere betweens apps. Simply drag a picture into a message or drag a PDF from Files into an e-mail.

Probably the most awesome features coming to iOS is improved augmented reality. Apple developed a powerful tool for developers called ARkit and the test videos that have been released over the last few months show amazing potential. From playing games on a tabletop to trying on a new tattoo to redecorating your house, there are endless possibilities. I for one am extremely excited about AR in iOS 11.

With the iPhone 6 Apple introduced Apple Pay and now they are expanding that to allow person to person exchanges. Now you can immediately pay your friend back for that lunch or movie ticket, right in iMessages. Now, this feature will not immediately be available at launch, it will be coming in a future update.
Ever take a photo at just the wrong time and wish you could choose just a moment right before the photo was actually snapped? Well now you can! One new feature of Live Photos is the ability to choose which image is the key image. No more half-closed eyes or blurry slightly turned heads.
Another cool feature of Live Photos is the option to choose how that ‘video’ loop is played out. By default there is a start and an end, but now you can choose to have it Loop, Bounce (play forward then backward), or to combine all the frames from the Live Photo into a Long Exposure image.

Your iPhone can now automatically sense when you are driving and silence all notifications for the duration of your drive. People trying to message you can be notified by a custom message that you are driving and will respond when you arrive. I feel like this is a really big one, others may just find it an annoyance. Although if you’re someone who finds it annoying maybe you need to check your texting and driving habits…

Apple has also made improvements to Siri with a better, more natural sounding voice, added the ability to provide translations and much more. The App Store has been redesigned to give a more personal connection and allow developers to tell their story about the app they created. Control Center has a all new look and feel, you can now customize the icons that appear, depending on what you use Control Center for the most.
These just scratch the surface of what Apple has introduced with iOS 11. Visit Apple’s website for more detailed information or a full list of what’s in store for your device after you upgrade. As always, **BACK UP YOUR DEVICE BEFORE PERFORMING AN UPGRADE**. Apple does a great job to limit the amount of issues with upgrading but you don’t want to be ‘that guy’ who loses everything.

Taking and sharing pictures and videos on an iPhone or iPad can be lots of fun. Sometimes just adding an Instagram filter just doesn’t seem like enough, doesn’t do it justice. That’s where Apple’s Clips app comes in! Clips allows you to quickly and easily create fun and unique videos highlighting moments of your favorite pictures and videos.
Using apps like iMovie can be complicated with tracks and timelines but Clips aim to keep things easy. Simply touch and hold a single button to take video and photos, or add them from the Photo Library. Then add filters, speech bubbles, shapes or emoji, and Disney and Pixar characters. You can also add custom text just by speaking!

In addition Clips also has built in music to choose from; the music automatically adjusts to fit your video. There are full size titles and posters with animated text and background effects to give your videos just a little more flair.
Sharing your videos from Clips is just as easy. Simply tap the share button and you can upload directly to Facebook, Instagram, YouTube and many other social media platforms you use. You can also share the video through Messages, Clips will recommend users you share with the most. Or if you wish, you can simply save the video to your Photo Library to share later.
Clips by Apple can be downloaded for free from the App Store.

Backing up is like insurance for your data, you may not ever need to use it but when you do you are eternally grateful it’s there. I have had so many interactions with people who are desperate to recover any data, any pictures because they were either never backed up or had not been backed up for an extended period of time. Sometimes data recovery is possible but it can be quite expensive, it’s much cheaper to just back it up in the first place.
You need to back up all your devices: computer, phone, and even your external hard drives. Any of your devices may fail at any time either from a defect or an accident. Nothing is 100% safe so the more copies you have of your data the better, especially the most important and most irreplaceable things such as pictures.
It may sound silly but the most important thing about backing up your data is remembering to actually back up your data! For any backup that is not automatic you should set a reminder for yourself at minimum once a week (and then actually do it). For any backup that is automatic you need to check it occasionally to make sure it is doing it’s job. Either way, remember to and make sure you are backing up.
It is always recommend to have a 3-2-1 backup plan. Basically you need to have 3 copies of your data, 2 on-site and one backed up to the cloud. The 2 on-site copies being your primary copy and a second copy on a flash drive or an external hard drive. The 1 cloud backup could even be as simple as keeping it in iCloud, Dropbox, Google drive or some other such service.

Backing up your iPhone or iPad can be done in multiple ways, the most convenient being to iCloud. When you set up iCloud on your device the iCloud backup is automatically turned on. Your device will back up every night when the phone is connected to wifi and plugged in to power.
The second way to back up your data is by plugging it in to your computer and backing it up in iTunes. This obviously has the downside of having to remember to do it as well as the data being stored on your computer. If something were to happen to your computer then this data would be lost as well.
Apple has included a piece of software in MacOS that makes it easy and convenient to keep your computer backed up. This program is called Time Machine and performs a complete backup of everything on your computer to any external hard drive. Time machine will perform continuous backups while your computer is connected the the external drive and plugged in to power.
There are alternatives to Time Machine, other software that can also perform backups to an external hard drive. A program called Carbon Copy Cloner creates a bootable backup, meaning that is needed you could actually boot your computer and run it off of the backup. Another program called SuperDuper does a similar task and is a free application.

There are many services that offer cloud backup plans to keep a backup of your data. These services are very secure and very convenient but do come with a monthly subscription fee. The top three services and ones that I have had personal experience with are Carbonite, Crashplan and Backblaze. You will have to research them and decide for yourself which will fit your needs the best.
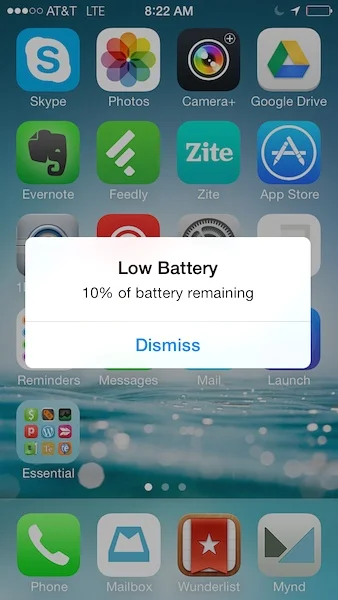
Battery life. It’s something we all consciously and subconsciously think about with all our devices but especially our phones. There’s nothing like that sinking dreadful feeling you get when you look down at your phone and it’s less than 20% and you have no way to charge it. This post will give you tips on how what to do in that scenario as well as how to get your battery to last longer day-to-day and also how to extend the life of your battery.
Similar to having a view to manage your storage, iOS has a menu to view your battery usage. This menu shows you what apps have used the most battery in the last 24 hours as well as over the last 7 days. From here it will give you a good idea of where a good portion of your battery is going, exactly how much of your battery is being drained from all that Facebook browsing.
Getting to this menu is easy, simply go to Setting>Battery. Once the menu loads it will order the apps by percentage battery used. Next to “Last 24 hours / Last 7 days” there is a little clock, tap this to activate a more detailed menu showing time on screen and time in the background.
If you take anything away from this article hear this: **Stop force closing all your apps.** This is a huge myth that has perpetuated over time from person to person and is actually worse for your battery then just leaving them be. Not to be too detailed about it but almost immediately when you leave an app it goes in to a deep freeze. If you launch it back up soon after it will pick up where you left off as it is loaded into your phones RAM. Otherwise if you don’t use it for a while it goes away on it’s own.
The real battery drain is a feature called “Background App Refresh” which does what it sounds like, it launches an app in the background so it stays up to date when you want to open it. Sounds great unfortunately it allows many apps significant power drain. To turn this feature off simply go to Settings>General>Background App Refresh and from there you can toggle it off for individual apps or off altogether.
Having your e-mail accounts on your device can be super convenient (or a little annoying always having e-mails pop up). The more mail accounts you have and the more often they are updating the more your battery drains. To change the retrieval settings for the mail accounts go to Settings>Mail>Accounts>Fetch New Data. The option that uses the least amount of battery will be setting ‘Fetch’ to ‘Manual’. When you set this option your phone will only check for mail when you launch the mail app.
If the option for ‘Push’ is available that is generally not too battery intensive. Instead of the phone check with the e-mail server to se if there is any new mail, the e-mail server will just send the mail to the phone when it arrives. If ‘Push’ is not available then you will want to set ‘Fetch’ as least often as possible.
Location services are a very useful feature, I for one use an app called Waze very day to see if there is traffic along my route to and from work. Different apps use your location to give you recommendations based on where you are. To manage location services go in to Settings>Privacy>Location Services and from here you can manage when or even if certain apps are able to access you location.
At the bottom of the menu there is a menu called System Services. From this menu you can toggle system location services su as location based ads. Some of these you will want to leave on such as setting time zone. One last menu deeper is an option that is a pretty big battery drain, ‘Frequent Locations’. Turn this off and it will help your battery life pretty drastically.
Just having your display on at all drains your battery, the screen and backlight draws more power than almost anything else on the phone. Keep your phones backlight as low as tolerable to save much battery power. Have your phone set to lock in as short a time as possible. These options can be managed under Settings>Display and Brightness.
One more display setting you can turn off to save battery will be a personal preference. This setting will turn off a lot of the fancy transition graphics going from app to app and back to the home screen. To turn this off go to Settings>General>Accessibility>Reduce Motion.
Getting push notifications all the time can be a big battery drain. Piggy-backing on the screen draining power, every time you get a notification your screen turns on which drains just a little more power. To manage what apps get notifications and where you see them go to Settings>Notifications. From you here you can turn notifications on or off, set whether they appear in the lock screen or see how they appear on the screen, as banners or pop-ups.

Your iPhone keeps an index of all your devices contents, e-mails, messages, contacts, everything. Every so often your iPhone will re-index to check for anything new, any changes. Unfortunately there is no way to straight up disable Spotlight but you can choose what it indexes. Simply go in to Settings>General>Spotlight Index and you can turn off whichever apps you don’t need to be able to search through.
Without data your phone would be nearly useless but your phone uses a different amount of power depending on whether it’s using wifi of LTE. Using your phone on wifi will use the least amount of battery and using your phone on LTE will use the most amount of battery. (Using your phone on wifi will also use less of your phones data plan, but that’s a story for another time.)
When you are out and about and are not using wifi, it is best for battery life if it is turned off and not searching around for networks to join. Worst case scenario if you need to drain every ounce of power from your draining battery it is also recommended to turn off your LTE. You can do this by going to Setting>Cellular>Cellular Data Options and toggle LTE off.
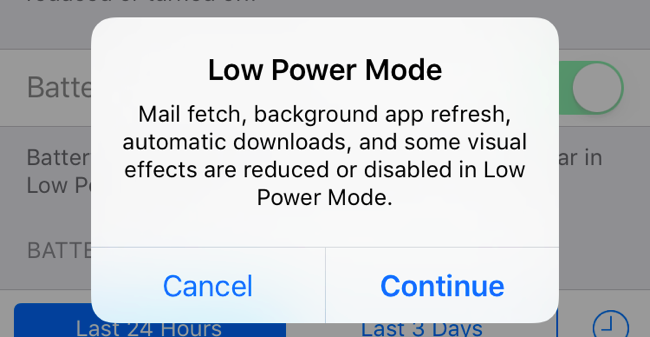
This is an option you can enable sooner but will automatically prompt you when you get down to 20%. Low Power Mode is a battery saving mode you can put your phone in to. It will automatically disable a few power hungry background features (most of which are listed above). According to Apple, low power mode limits the following features:
Batteries can be greatly affected by ambient temperatures, too cold and it can’t work, too hot and it drains quickly. If you’re ever had you phone out in the winter and it turned off before it ran out of battery, this is why. The recommended operation temperatures for an iPhone are between 32º to 95º F. Your iPhone battery heats up while charging, too. To keep it cooler while charging it is recommended to take it out of it’s case, the case can insulate the phone and trap heat allowing the phone to get warmer than it should.

Speaking of charging, there are some habits to follow to get the most life out of your battery. First and foremost, only use Apple approved charging cables and charging blocks. Typically, Apple approved equipment follows what Apple classifies as MFI or Made For iPhone. Low quality and cheap stuff can cause major problems, even going so far as to short out your phone causing it to catch fire. Now that rarely happens but you still want to be careful.
Another thing you can do to help the longevity of your battery is to let it drain as much as possible (down to below 10-20%) and leave it on the charger until it get’s back up to 100%. Now, it is not necessary to do this every time, battery technology has greatly improved over the years. If you need to occasionally only charge it a bit to top it off, go right ahead.
If you were like me you didn’t want to spend the extra $100 to get the iPhone with extra space thinking, “Oh I don’t keep a lot of stuff on my phone, I will be just fine.” Now, you keep seeing the awful message pop up telling you your “iPhone storage is almost full”. I have compiled a few tips to help you clear some much needed space from your iPhone or iPad.
The first thing you want to do is to see where all your space is being taken up. iOS has a nifty feature that gives a pretty detailed overview of you storage space. To see this go to Settings>General>Storage and iCloud Usage and tap on iPhone Storage. Once this screen populates it will show you how much data each app is using. From here you can decide what you need to focus on to help clear space on your iPhone device. If your Notes app is saying there is hundreds of MBs being take up then it may be time to go through and purge your Notes. If you have a video player app that has hundreds of MBs or even GBs there may be video in that app that can be deleted. Or even if there is an app you haven’t used in months or years you could straight up just remove the app from your phone.
When Apple releases a new update they try to make it as easy for you as possible. One of the things they do is automatically download the update to your device so that when you are ready to install it it is already there for you and you don’t have to wait for it to download to install. This can be convenient but sometimes updates are fairly large in size. It is best to run the update and install it, that will then remove the installer from your device. If you are hesitant about updating it you can delete the installer from your device by going to the iPhone storage menu in Settings>General>Storage and iCloud Usage. From here you should be able to see the installer and remove it.
If you have never changed this setting it is automatically set to keep all your message and attachments forever. And if you are like most people you send and receive a decent amount of attachments, whether they are pictures, videos or even stickers. Keeping all these is fine on your computer with all the free space it has but with the limited space your iPhone has it can be a huge drain. **Before you enable this setting be sure to go through all your picture attachments and save any you want to keep.** To enable this setting to automatically delete older messages and attachments simply go to Settings>Messages and scroll down till you see ‘Message History: Keep Messages’ . Simply tap this and select whether you would like to keep for 30 Days or 1 Year. When you select something shorted than “Forever” a pop-up will appear asking if it is OK to delete older messages. Assuming you have saved everything you want to keep simply select “Yes” and it will delete anything older than the time period you selected.
Similar to a computer, when you delete photos they don’t disappear completely. They go in to a special folder where they sit for 30 days, that way if you accidentally delete something it isn't lost immediately. Handy, but this can take up space you thought you were freeing. Simply go to Photos>Albums and scroll down until you see ‘Recently Deleted’ and tap it. Then tap ‘Select’ at the top then at the bottom tap ‘Delete All’ and confirm. This will immediately purge all deleted photos from the ‘Recently Deleted’ folder.
This tip is doubly useful in that it can help if you accidentally clicked a nefarious link and your Safari app is locked up with an e-mail pop-up or ad pop-up. **Keep in mind this will also delete your browsing history from all devices signed in to iCloud, including your computer.** To clear this data go to Settings>Safari and scroll down until you see ‘Clear History and Website Data’. Tap this and then confirm to clear this data.
By default your iPhone has two things enabled: HDR and Keep Normal Photo. HDR is an amazing feature where (in the right conditions) your iPhone will actually take 3 photos and combine them to highlight as much light and dark detail as possible. But, by default your phone will also take and keep the non-HDR photo at the same time. To turn this off simply go to Settings>Photos and Camera and turn off ‘Keep Normal Photo’. *Side Note: If you have an iPhone 7 Plus there is similar setting to turn off for portrait mode.
If you have music synced up to your iPhone you don’t have to hook your phone back up to clear music you don’t need anymore. And sometimes in order to play certain songs your iPhone will automatically download them to your iPhone. To check and clear these songs simply go to Settings>Music and scroll down to ‘Downloads’. Tap this and you can then swipe to delete any songs you want to clear off your iPhone. **Other music service apps have the ability to download music for offline listening, be sure to check any other music apps you might have such as Spotify or Amazon Music.
Another photos tip! If you’re like most people you aren't even aware of what Photo Stream is or does. Not a big deal but it is on by default and even tho they don’t take up as much space the photos in your Photo Stream are still there take space. To turn this feature off simply go to Settings>Photos and turn off ‘Upload to My Photo Stream’. The photo stream photos will then be removed from your iPhone but if you decide to turn this feature back on the photos will stay saved on iCloud for 30 days from when they were uploaded.
Even if you are not familiar with what Reading List is, I would still check this feature. There have been times when even I have accidentally added something to my Reading List. This feature has it’s uses, it saves a website to be available to read later even if you have no internet connection. To clear Reading List pages go to the Safari app and tap the book button at the bottom then tap the glasses icon. You can swipe to delete any pages in the list. **Note: This will delete the pages from all your devices Reading List.
I like to listen to podcasts but I don’t need them taking up my precious iPhone storage space. If you want to turn off automatic downloads of Podcasts you listen to just to to Settings>Podcasts and scroll down to ‘Download Episodes’. Tap this and then set to ‘Off’, this will prevent future episodes from being downloaded to your device. Now, to purge any that have previously been downloaded go to Settings>General>Storage and iCloud Usage. Under iPhone storage scroll down to Podcasts and tap it. From here you can swipe to delete any needed podcast episodes.
Update Tuesday! Apple has released an incremental update ot iOS 10 for iPads, iPhones and iPod Touches. There are no major feature changes, only bug fixes and security improvements to iOS.
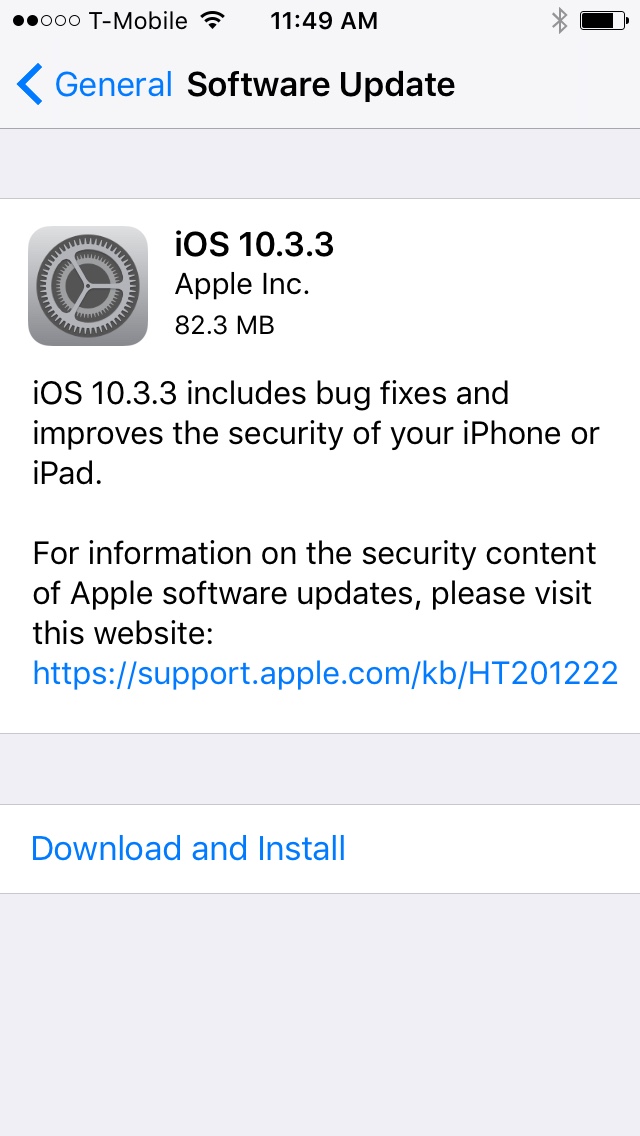
This update is recommended for all users currently running iOS 10 and is free to download via Settings>General>Software Update. As always it is recommended that you make sure you have a current backup before you perform the update.
This will be one of the last update to iOS 10 as Apple will be focusing more energy on the next version, iOS 11, coming this fall. If you want to try the new version of iOS, Apple has a public beta program. You can visit www.beta.apple.com for more information.
Monday-Friday - 9 AM - 5 PM
Saturday & Sunday - Closed